Home
Tutorial's
Image collection
Calculator
Projects
MCQ's
3d Models
Invention Hub
How it works
Download Our app
1: LED Blink Using Arduino
Required Skills:
1. Basic Knowledge on arduino
2. Basic Knowledge on C programming
Items Required:
1. Arduino uno
2. Breadboard with some wires
3. Light-Emitting Diode (LED)
4. Resistor (Range between 220Ω to 1000Ω)
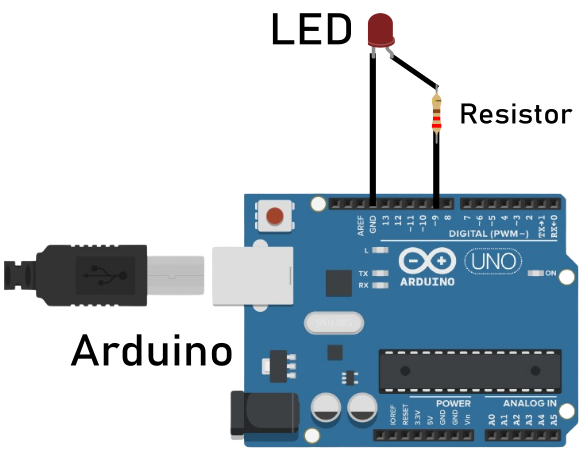
Circuit Diagram:

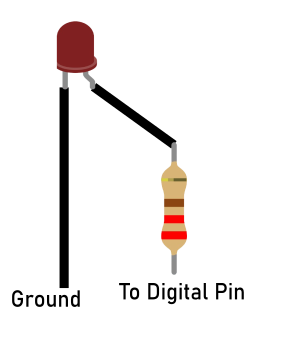
Connections:

Procedure:
1. Connect a negative terminal of a LED to ground.
2. Connect a postive terminal of LED to a Digital Pin of arduino with resistor
3. Setup and insert below code in arduino
        // C++ code

        //

void setup()

{

  pinMode(9, OUTPUT);

}


void loop()

{

  digitalWrite(9, HIGH);

  delay(1000); // Wait for 1000 millisecond(s)

  digitalWrite(9, LOW);

  delay(1000); // Wait for 1000 millisecond(s)

}
How it works
voild setup()
1. This function runs only once when the program starts.
2 .Pin 9 is configured as an output (pinMode(9, OUTPUT)).Thus, the voltage level on this pin can be controlled by the microcontroller. This will be used to switch the LED on and off.
void loop()
1.Once setup is complete, this method is called repeatedly.
2.The statement digitalWrite(9, HIGH); sets the voltage of pin 9 to high. This turns on, generally, an LED connected to that pin.
3. The line delay(1000); pauses the program for 1000 milliseconds, or 1 second.
4. The expression digitalWrite(9, LOW); sets the voltage on pin 9 to low. This is what normally turns off an LED connected to that pin.
5. Another delay(1000); line pauses the program for another 1000 milliseconds.
Working
1. Initialization: The setup() function runs only once right after every reset and configures pin 9 as output
2. Blinking Loop: The loop() function starts. The LED, connected to pin 9, lights up by making the pin HIGH. The program waits for 1 second. The LED goes off by making the pin LOW. Again, the program has to wait for 1 second. The loop is repeated, and hence the LED blinks.
